Wednesday, 3 July 2013

NPRY Wagon Weathering Technique

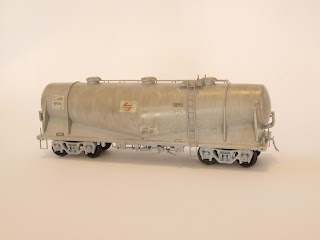
I've just finished the weathering job on the first NPRY wagon I've built and detailed. 

Overall I'm happy with the look, however there are a few things I will change next time. I should point out that I've used Tamiya and Mr Hobby Colour acrylics as they are much easier to use and clean up, and I am happy with the colour ranges available. 


This is the base wagon, primed and decalled (pretty stock standard). I decided not to bother with a bare aluminium finish as the base because it wouldn't be seen anyway. 

I washed over the wagon with a diluted coat of Tamiya XF-20 Medium Grey, and after that dried I went over with a diluted coat of XF-73 Dark Green. These colours gave a streaked base on which to apply the cement dust which adorns all these kinds of wagons.

This is where things become unique to each wagon, and one really must consult prototype photos depending on the look they want to achieve. I started with a light coat of Tamiya XF-24 Dark Grey in areas around the hatches, under the walkway and generally over the tank. The a light coat of Mr Hobby Colour H-51 Light Gull Gray over the body and to pick up detail, as well as the vertical spill lines down the body. Then a coat of XF-54 Dark Sea Grey to blend it in and further add to the 'dusting' effect. Note the 'workshop' bogies applied.


After the tank body had dried, I applied a layer of XF-24 Dark Grey to the underframe to give it depth. I then followed with a coverage of XF-79 Medium Deck Brown to give it a general road grime, followed by a light coat of Mr Hobby Colour H-44 Flesh to pick up detail and give some variety. I also gave the body a very light dusting of these brown colours, though it's not visible.


Whilst I had those colours loaded in the airbush I went over the bogies in the same grey-brown-light brown order as above. 

I left it all to dry, then used a paint brush to pick out the white levers and handbrake wheel. Also coloured the bearings and spring on the bogies. I wiped over the code-board with a brush dipped in thinner; as if somebody had cleaned it so see the wagon number through the cement and grime. I also trimmed the trip-pins off the couplers and bent the air hoses around, so when the wagons are coupled they will connected.

The view of the other side of the wagon upon completion. 

The main thing I learnt from weathering this wagon was patience; letting the first layer dry before proceeding onto the next is important to avoid spoiling the work already done. 

I currently have 1 more NPRY wagon ready for weathering  1 ready for painting and another which I'm adding details to now. I will post up the results of these jobs once I get around to them. 

Comments or feedback are welcome.

Cheers.

Links:


Saturday, 8 June 2013

CFCLA CF4412 and CF4411

On my way to uni yesterday I noticed a special CFCLA train waiting at Central platform 1.

 CF4411 in the usual CFCLA livery.

 Star of the show: CF4412 in a special livery based on it's namesake 'Black Caviar'

 Shiny.

 The locos began to run around the train. Of interest is on the stainless steel exhaust (?) cowling there are little 'Hot surface: Do not touch' decals. Good advice.

CF4412 was creaking and groaning as it negotiated the points; I'd say it needs a good run-in.

The livery is actually quite attractive, whoever designed it has done a good job on the colours and layout. 

Monday, 20 May 2013

Berg's HUB Set

Although I've named this blog "Bigdirtyfreighttrains" there is always room for a passenger set. 
Buying RTR items is somewhat boring for me especially when there are kits available (with the exception of Locos, I prefer them RTR)

I have been working on a Berg's HUB set for some time, following the article in December 2010 (Issue 285, Vol. 12, No. 12) of the Australian Model Railway Magazine


The idea behind me making these is that they are a 'preserved' set. The historical accuracy of the set is second to building the cars to the livery and making of my preference. 

The FH car is my 'most' complete. The only addition is the interior lighting when I get around to doing it. The roof is also not fully secured.


 The RBH is complete minus steps and lighting. You can more easily make out the green first class seats inside.


The PFH wagon needs some finishing touches, steps and lighting. As per the kit from Bergs there is a 2BS bogie above the generator, I would have rather just added another 2AN and modified it a little bit, but I still think it looks the part.


Now for the more incompletes. This BH needs decals, interior and all the other fiddly bits I've mentioned. Bogies also need to be added.


The RFH car needs to be assembled (floor is just sitting in place), roof needs detailing plus everything else to make it complete. I haven't glued the floor yet as I've been using it as a guide to do the underframe of the next car.


The HFH is the final car I bought (due to availability at Berg's) and is currently needing a complete underframe detail, roof detail, painting, etc etc. The handrails on the terminal end are going to be an interesting test of my soldering skills.


Here are the 2AN bogies destined for the HFH car. In these ones I decided to solder wire directly to the brass bearings in the bogie. This will then be run through the floor to the lights in the roof. 

The lights I will be using for the HUB cars are from Trainaidsa in the US. The LED strips are modular, and the Flicker free circuit (black bulge) plugs straight in to them without any soldering.

 The pickups are also from Trainaidsa and are designed for Marklin coaches. They fit and work well thought so I will be using them on the HUB cars.

The wire is from Model Railroad Craftsman in Blacktown. It's thin and flexible so works well to run around tight spaces inside the cars.

As a whole the Berg's HUB cars are great and I would buy them over RTR anyday, but that's because I like assembling and customising them. I am looking forward to having the complete set with lighting.


Sunday, 12 May 2013

NPRY Update

Another quick update, I have finished detailing the two NPRY's I got from AR Kits. 
I did decided to replace the ladders after going past Clyde on numerous occasions and deciding the metal etched one looks much better. However I did away with the soldering iron and used super glue instead. With my lack of brass soldering skills this was better and much neater than I had achieved before.
I also added:
  • Uncoupling bars
  • Side handrails
  • The rivets on the ends of the wagon behind the coupler bar. (little brown dots)
Overall I'm now very pleased with their look, and next stage will be painting and weathering.


 The ladders look much better now.


Here's a comparison with and older (~5 yrs) standard NPRY and the detailed one I've just finished. The photos don't complement how much better they look. Eventually I will upgrade the Freightcorp one to the same standard. 

Enjoy!

Sunday, 5 May 2013

NPRY wagon (AR Kits)

Hi all,

I bought 2 NPRY wagons during AR Kits March Madness sale (great idea!) and I set about trying to make them more accurate to prototype.At this stage I have started on one, I added an etched brass mesh deck from the Keiran Ryan Models kit (KRM-101) to replace the original plastic one; I think the difference speaks for itself, much better. 
As for the brass ladders, I struggled to solder them in place, and upon close inspection the only major difference between these and the original plastics was the rungs are slightly thicker on the plastic, something which for the sake of long and frustrating soldering time, I will live with happily.

This photo shows the roof walkway and some of the added detail to the underframe. I replaced the plastic spider wheels with the brass from the KRM kit, and discarded the plastic wheel as the prototype photos I was using did not have these equipped. 

From the other side, this shows the mesh deck quite nicely. It does make a substantial difference to the appearance. 


Here is the underframe, I roughly followed what I could see from prototype photos, however I just wanted to give the impression that there is a lot of piping down there. I am satisfied with the view from the side. I also glued a piece of flat lead sheeting to the top side of the underframe, and glued it in place instead of using the included screws. 

I am hoping to do a bit of painting this week, and I will photograph the progress for those interested.

Only problem is that I have about 5 other NPRY's and will have to look at updating them to the same standard at some stage. 

Cheers,


Sunday, 17 March 2013

Locos

Well it's been some time since my last post. Nothing too drastic has happened in the world of modelling (as far as my fleet is concerned), However I thought I'd share the three most recent locomotives in my roster. 

 On Track Models 8226 - Been looking forward to this since I ordered it at Liverpool last year. I'm sure many people have been waiting for an 82 class, I know I have! TrainOrama teased us a few years ago saying they would produce one, but that must have fallen through the cracks at some stage.
Although I haven't run it yet, I must say the model looks fantastic. Detail looks great and the finish is fantastic. Interesting how On Track went for a Mashima motor instead of the 'normal' practice of using ones from the factory. I guess it guarantees spares in the future, and the quality of them is great.
I plan to make this beast a 'flag-ship' if you like; first of my locos to have sound and I'm going to weather it to the best of my abilities.


Two NR class locos, NR56 and NR60. I bought these from Epping [Thornleigh] and Liverpool for $175 each. Not bas considering their RRP is $275, however they do lack a lot of the finer details we have come to expect in more recent times. With Auscision doing the C43/44ACi, there may be a market for some 'spare parts' compatible with the NR?

I took these photos with my Dad's DSLR camera, after some difficulty I eventually worked out the way to take better photos with it. The lighting needs improvement but overall they are better than what I have done in the past.

I have also been working on some more Berg's HUB cars. I now have all the cars to make up a 6 car set, however only 3 are complete (PFH, RBH, FH). one is painted but not decalled (RFH), one is painted but not assembled (BH) and the last is still in pieces (HFH). I am planning on installing lighting into them, and am awaiting parts for this.

Until next time!